March 26, 2013

{Recipe} Crab Rangoons

I wanted to share this amazing and easy recipe for Crab Rangoons.  If you are anything like us, we could eat some type of Chinese/Thai food on the daily, so I was super excited to find something so easy and quick that I could make at home. Enjoy!

Ingredients

 Original recipe

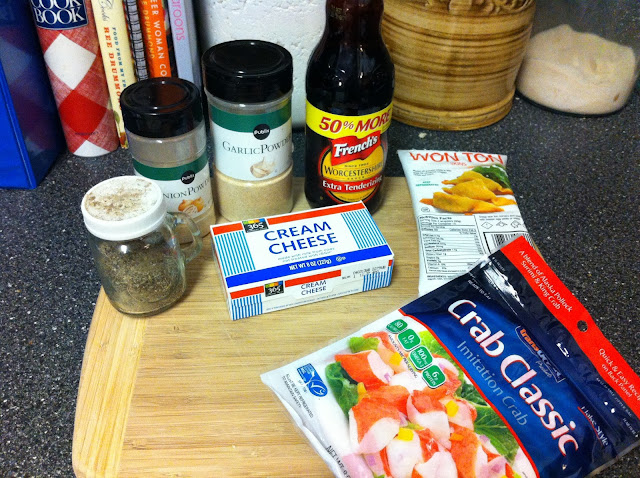
The ingredient list for these is super short, which I LOVE!  Big bang for your buck with there babies.
3 oz cream cheese
Half packet imitation crab meat
1/2 tsp of onion powder
1/4 tsp garlic powder
1/4 tsp black pepper
1/2 tsp Worcestershire sauce
Packet of Wonton Wrappers ( I only used half)

Step 1: Mix together all ingredients
Step 2: Begin filling your wonton wrapper. I only used about a teaspoon of filling per wrapper. This was PLENTY and I didn't want any overflowing. After adding the filling, using water or egg whites, wet the edges of the wrappers and pinch closed. 
Step 3: Fry up those babies!
Step 4: Let them drain on some paper towel and cool before serving.
Oh my goodness these are good!  I wont disclose how many I ate but I will say they sure didn't last long!  
Yum!

Follow Along!


March 23, 2013

Girls Night & Paint and Pour

One of my very good friends, Megan, is getting ready to move all the way across the country to Colorado.  While I am so happy for her, I am super sad for myself.  I am going to miss her so so much!  Since she is leaving in less than 2 weeks, we decided we needed to have one more girls night!

The night started with an appetizer dinner at Applebees.  If you have never had a dinner of just appetizers you are seriously missing out. Its like having snacks for dinner, which is so fun! We just hung out for awhile and talked and talked and talked. I'm going to miss this girl so much, she always knows just what to say. Whether its advice or just to tell me I am a crazy person.

After dinner we headed over to what I was super excited for, Paint and Pour! Its a private art class that included step by step instructions...and you can bring wine. Sold!  The canvas that we painted I had seen floating around Pinterest (here and here) but it was so much fun to create!
After having so much fun painting there is really nothing else that could make this girls night better, right?! 
Wrong.
Tattoos.  Tattoos make every girls night epic.

Matching star tattoos were the only logical way to end our night. Now I will have this super cute tattoo to always remind me of my great friends and the amazing girl night we had!  


Follow Along!


March 19, 2013

St Patrick's Day

This year for St Patrick's Day we went to downtown Columbia for the St Pats Festival.  I alllmost didn't go, just because I knew it would be a bunch of guys Sky works with and I didn't want to a crasher. But I am so so glad I did! Let me tell you, it was nuts!  Full of college kids, people so drunk they couldn't even sit on the curb, and yummy food and beer! 
 I seriously enjoyed just hanging out and people watching.  There were a ton of band there some I knew, like Chevelle and Josh Thompson, but most I didn't. Towards the end of the night we ended up in the country bar which I loved!  I had to sweet talk most of the guys into going with me but in the end we all had a blast!  Dancing and singing and laughing at a blondie that would not leave us alone! 
So.Much.Fun

Also, Google Friend Connect is being removed so if that's how you are following along with Kieran Honeybee please follow somewhere else so you don't miss any updates! My favorite is Bloglovin, its so easy!  

Follow Along Here!

March 11, 2013

{Recipe} Minnie's Chocolate Pie

I think we have all heard of the amazingness that is The Help.  Well every time I watch I feel like I should be eating a big fat slice of chocolate pie. Ya know, without that one surprise ingredient.  So I did some searching around for a recipe, stumbled across a couple that were pretty different.  Tried them all, and this is by far my favorite! 

 Ingredients

You first need to bake your crust before putting in any filling.  I used a frozen crust and just let it thaw about 30 minutes before baking it.  Prick the bottom of the crust with a fork a few times, then cover the edges with foil so they don't burn.  Pop it in the oven and let it bake for about 15 minutes. The original recipe say to cover the crust with foil and add pie weights so the bottom doesn't puff up, well I don't own pie weights.  If I see any puffiness before 15 minutes is up I just take the crust out of the oven and re prick those spots with the fork. When 15 minutes is over pull out your crust, remove the foil and let it sit while you mix up the filling.  Also, when you're removing the foil be very careful.  The dough is going to be soft and will tear away easily.
While you're crust is cooling you can start mixing together your filling.  Its really hard....mix together all ingredients.  : )   When I say  mix it all together I am being literal, use your hand mixer or if you are a lucky duck and have a stand mixer, use that.  You have to mix for awhile, I would say a good 5 minutes to get all the ingredients thoroughly blended.  The coco powder like to clump together.  


After you have mixed all your ingredients, its time to pour it into the crust.
And that's it.  No really its that easy.  Bake for about 45 minutes and let it cool until you cut into it.  After it cooled be careful and don't eat the whole thing in one sitting.  Or do, whatev.
Original recipe found here.

March 8, 2013

A little honesty

Today sucks.

I'm not really sure what is going on lately but I am in a serious funk.  Everything is making me super weepy, like I desperately want to call and interrupt Sky at work just to hear his voice and cry. These times hit me every couple of months with no warning and thank god they only last about a day or two, I don't think I could handle much more. Its just hard sometimes.  Life is just too hard for no good reason and I get caught up in it.  There's a lot going on around here that I haven't written about because it seems so private, but maybe I will one of these days. Writing is good for the soul and I am slowly realizing that.

We live so far away from home. I am a very family centered person, I need them in my day to day life. Calling only does so much, ya know?  It hurts my heart, I'm finding that its always about this time of the year. We were just home for Christmas, yet it seems ages ago that I hugged my mom and kissed my nanny.  As of now, we have no immediate plans on going home either.  The Air Force can be stingy with those leave days and while it is tempting to just get away for a couple days I know that we need them for the future if we really want to take a real vacation this year.  

I guess that I just needed to write this out and maybe it would get some sadness out.  I think the only cure to these weepy days is to watch lovey movies and listen to sappy songs and let it all out.  That's what works for me. I have been listening to these songs on repeat.


March 1, 2013

{DIY} Burlap Banner

We recently got a new KING size bed (!!) and moved our old bed queen into the spare room, and even though the queen size took up a majority of the room it was still lacking....something.  It took me a little bit to realize that it needed some fun decoration for above the bed. So I did what every girl does when she needs some inspiration, I checked Pinterest. Ah, Pinterest, you never let me down! I discovered that I NEEDED to make a cute burlap banner.
I quickly checked all my crafty supplies to make sure I had everything I needed, I did woohoo!  OK so I kinda flew by the seat of my pants with this but it ended up being a super easy DIY  I knew I wanted it to be about the length of the headboard, which was about 6 medium sized squares.  I used this Valentines Day banner that my mom made for me as a size template and cut out my burlap pieces.
Isn't this banner just the cutest!? If you want one for yourself she sells them (and super cute bags) in her etsy shop!

After I cut my squares I ironed them smooth,  folded over a 1 inch hem over a piece of twine.
The wonderful part of the instant hem tape is that all you have to do is iron it. That's it. Just hold the iron over the area and not only does it glue down the edge but it also saves you a ton of time! Also, since the twine is in the folded part of the fabric its not glued down. So if you have to adjust the string a bit you can pull it in or out. Completely adjustable. 

The next step is to cut some hearts out of a book of your choosing.  It could be a random book you have laying around or it could be be a book that has special meaning.  I choose an extra Harry Potter I had on my book shelf. All you potterheads out there please don't hate me, even though it was an extra I still had a hard time damaging the book!  

You can freehand a heart right onto the pages or you can make a pattern to use.  I had some extra felt on hand so I made a pattern, my freehand is not very trusty.

After you have all of your hearts cut out then all you have to do is attach them your burlap!  I used more of the instant hem only because I didn't have anything else.  While this method worked out fine for me I think an easier way would be to use a spray adhesive.  If you are going to use the instant hem make sure that you are not ironing directly on the paper. After you are done ironing on all your hearts, its time to hang it up!

That's it!  Easiest project I've done in awhile! I think it took me all of 20 minutes.

Follow along to get more craft ideas and updates!

Linking up with these ladies for the Pinterest Challenge!
Young House Love
Bower Power
The Remodeled Life

Decor and the Dog