Showing posts with label DIY. Show all posts

October 30, 2013

The Christmas Sampler

Hello all!  I am popping in to let you all know about The Christmas Sampler!  My mom called a couple months ago and told me she just happened to get a booth at the sampler and was sharing all of her ideas.  I casually said "I wish I could come!" Which then led to why not?  So, I have been crafting and creating for a couple months and the time has come, its this weekend!  I have no idea what to expect, this is my first craft fair, but am so excited!  I cant wait to see how people react to the things I have created but also, to wonder around and enjoy what other people created!  Here is a sneak peek at what we will have in our booth:

If you live in the Nashville area, we would love to see you!  Come stop by and browse around and say hi!  Here is the address:

At the Center
401 North Main Street
Springfield, TN 37172


Premier Night
Friday, November 1
4:00 to 9:00 p.m.
(Admission $7.00)


Saturday, November 2
8:30 a.m. to 5:00 p.m.
(Admission $5.00)


September 8, 2013

{DIY} Polka Dot Felt Garland

Happy Sunday!  I hope you all have had a great weekend!  I have been busy quilting, doing homework, and fighting a cold Sky gave me : /

I did want to pop in and share an easy DIY that I did a couple weeks ago to decorate my big chalkboard. I have seen these garlands all over Pinterest and they are just so darn cute and perfect for draping on anything!

I used 5 different colors of felt, just one sheet of each.  Used a roll of washi tape as an outline and cut 10 of each color. I didn't get a picture of the sewing part but all you do is sew a straight line right through the middle of each circle, continuously until you use all of the circles.


August 17, 2013

{DIY} Mason Jar Pin Cushion

Happy Weekend!  Thank goodness right?!  
I just wanted to share this super easy ( and adorable!) pin cushion!  I recently got a new to me sewing machine and have LOVED pulling out all of my old sewing supplies out of storage. Unfortunately, my machine needs a little fixing before I can tackle my loooong to-sew list but this project doesn't require any sewing and gets your pins organized. 
All you need is:
  • Glue Gun
  • Mason Jar or old jelly jar (which is what I used)
  • Scrap of fabric
  • Stuffing
  • Hot glue some of the stuffing to the lid of the jar. More fluff means bigger pin cushion, less obviously mean you will have a smaller cushion.  I dont have a huge stash of pins so I used a small amount of fluff
  • Cover stuffing with scrap of fabric. Its not necessary to glue the fabric but if you want, you can
  • Trim excess fabric or glue to the bottom of the lid.  It works either way.
  • Fill jar with pins and add a few to the top for easy access
Admire your new pin cushion!  Its much cuter than the standard tomato that is sold in all the fabric stores!


June 15, 2013

{DIY} EAT Sign


Just popping in with a quick DIY!  I have been obsessed with these EAT signs for months and wanted to hang them somewhere in my kitchen.  

I loved these ones that are so popular at Anthropologie but wasn't willing to spend $18 a letter. And I wasn't so sure they were my style.  So I went the cheapo route and got some from Hobby Lobby (on sale!) and painted them up myself! 

Happy Saturday!!


June 5, 2013

{DIY} Food Passport

Well I crossed another project off my ever growing list! I found this super cute idea on Pinterest awhile ago, I think it was way down on the list!  
The general idea behind making a food passport is to find restaurants in your hometown that you would like to visit (or revisit), write them down in the book, and stamp them once you have been!  For me, its motivating to try new foods and venture outside my comfort zone. I love to eat but am extremely picky but I think that i'm ready to expand my food horizon, so to speak.
I picked up this adorable polka dot notebook at Target (of course), cut a piece of scrapbook paper I had on hand and got down to business researching yummy restaurants.  The longest part is the research!  Since we live in such a big city there were so many to choose from!  It made me realize how little different places we have been. 

I found most of inspiration from these sources. Here & here. 

If you make a food passport I would love to see it!  Link your posts in the comments!


May 14, 2013

{DIY} Yarn Storage

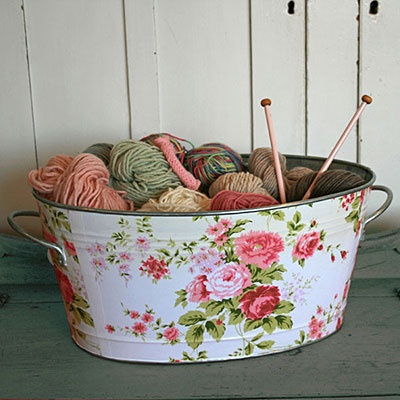
So I have this problem, a yarn problem.  I have piles of yarn that I have bought and only used parts of for other projects and now they are just piling up. I wanted some type of storage that I could DIY and would fit with the vintage y theme of my spare bedroom/craft room.  I loved this one but couldn't for the life of me find a galvanized tub!
I had this Santa popcorn tin still hanging around from Christmas that was desperate for a makeover. It also happened to be the perfect yarn hiding size. Annnd I had chalkboard paint. Perfect.
I ended up painting 3 coats just to make sure everything was covered evenly. I let the paint dry about 45 minutes between each coat. After the 3rd coat dried I "cured" the paint. Cover the entire tub with chalk, if you don't everything you write on the tub will stick and leave an imprint.
All done!  So cute and versatile!

post signature

April 16, 2013

{DIY} Recycled Candles

If you are anything like me you have 20 almost empty candles just hanging around, kept there because there is still too much wax to just toss it and yet the wick is so burnt it wont light.  So what do you do with it?  You melt the remaining wax and make new candles!  While this is an easy process, it does require some patience.  Wax doesn't melt as quickly as I thought it was going too.

I melted my wax two different ways. I had an almost full jar candle to melt down. For some reason the wick would never stay lit. I just plopped the whole jar in a pot of hot water and let it completely melt.

 I had the water heated only to about medium high heat, I only heated it this hot because I didn't want the glass to break and it got the job done. Once all the wax was melted I poured it into an empty jar with a new wick. 
These are the wicks I used, they were 3 1/2 inches long and can be purchased at any craft store.  The jars were just ones I had on hand, empty honey jars.

The second way I had to melt wax was like this....

 I don't have a stacked sauce pan, but if you do, it would be perfect!  I just put a small metal bowl in the hot water and it worked just fine.  After I has scraped all my old candles the excess wax was put in the bowl.  I didn't pay any attention to the wax color, I wasn't really worried about what color the new candles were going to be. As the wax melted I poured it into the empty jars and then would put the bowl back in the water to let the wax continue to melt. That's how my candles turned out different colors. My bowl was pretty full of wax so again I would say it took about 30 minutes total to melt all of it.
Happy candle making!

March 1, 2013

{DIY} Burlap Banner

We recently got a new KING size bed (!!) and moved our old bed queen into the spare room, and even though the queen size took up a majority of the room it was still lacking....something.  It took me a little bit to realize that it needed some fun decoration for above the bed. So I did what every girl does when she needs some inspiration, I checked Pinterest. Ah, Pinterest, you never let me down! I discovered that I NEEDED to make a cute burlap banner.
I quickly checked all my crafty supplies to make sure I had everything I needed, I did woohoo!  OK so I kinda flew by the seat of my pants with this but it ended up being a super easy DIY  I knew I wanted it to be about the length of the headboard, which was about 6 medium sized squares.  I used this Valentines Day banner that my mom made for me as a size template and cut out my burlap pieces.
Isn't this banner just the cutest!? If you want one for yourself she sells them (and super cute bags) in her etsy shop!

After I cut my squares I ironed them smooth,  folded over a 1 inch hem over a piece of twine.
The wonderful part of the instant hem tape is that all you have to do is iron it. That's it. Just hold the iron over the area and not only does it glue down the edge but it also saves you a ton of time! Also, since the twine is in the folded part of the fabric its not glued down. So if you have to adjust the string a bit you can pull it in or out. Completely adjustable. 

The next step is to cut some hearts out of a book of your choosing.  It could be a random book you have laying around or it could be be a book that has special meaning.  I choose an extra Harry Potter I had on my book shelf. All you potterheads out there please don't hate me, even though it was an extra I still had a hard time damaging the book!  

You can freehand a heart right onto the pages or you can make a pattern to use.  I had some extra felt on hand so I made a pattern, my freehand is not very trusty.

After you have all of your hearts cut out then all you have to do is attach them your burlap!  I used more of the instant hem only because I didn't have anything else.  While this method worked out fine for me I think an easier way would be to use a spray adhesive.  If you are going to use the instant hem make sure that you are not ironing directly on the paper. After you are done ironing on all your hearts, its time to hang it up!

That's it!  Easiest project I've done in awhile! I think it took me all of 20 minutes.

Follow along to get more craft ideas and updates!

Linking up with these ladies for the Pinterest Challenge!
Young House Love
Bower Power
The Remodeled Life

Decor and the Dog

January 17, 2013

{DIY} Kitchen String Art

Another DIY to check off the huge (and ever growing)  list!  This project was so much fun!  It was incredibly easy and took only about 45 minutes. I got the original idea from the amazing blog A Beautiful Mess, with some other fun inspiration found here and here.

 Supplies

  • Slice of wood (I got mine at Joann Fabrics)
  • Template
  • Black pain
  • Scissors
  • Paint brush
  • Small nails
  • String

Cut out your template and trace onto your slice of wood.
Paint around your outline.  It may look a little wonky but it adds character! 
Start adding your nails.  Evenly space them all the way around.
 
The fun part!  Add your string,  I just tied a knot around one of the nails and went to town wrapping! 
I wanted to hang mine with twine so I just hot glued a piece on the back and hung it on the side of a cabinet!

Easy peasy!  Follow along on Pinterest to see all of my DIY projects!

Linking up here & here.
& here : )